Getting Started With the Snergs SiteWe're going to use the "Absolute Three-Column Layout with Header" template that we created in Chapter 5. It's the one with three columns, a header, and absolutely positioned side columns. We are going to use the "Absolute Three-Column Layout with Header" template instead of the negative margins technique we learned at the end of Chapter 6 because it is the less complex and therefore easier to use for learning purposes. Those of you who feel ready may want to look at the negative margins version of this page that I've put up on the Stylin' site (http://www.bbd.com/stylin). See "The Snergs Site Created with Negative Margins" sidebar at the end of this chapter for more information. The difference between the templates folder for each type of layout and the associated demo files used to develop these layouts is that real sites have separate XHTML and CSS files.
When you were learning how to create layouts in Chapter 5, it was convenient to have the CSS styles at the head of the page. However, such styles can only be seen by the page in which they live, which is not good for a real site where you want multiple pages to share a common set of styles. Because of this, I have moved the styles for each template example from the style element in the head of the template's XHTML document into a separate CSS file in a folder named css. The css folder is located at the same level as the XHTML document, and it is linked to the XHTML page using the link tag. Simply use a link tag in the head of each XHTML page to link the style sheet to the page, like so
<link href="css/stylesheetname.css" type="text/css" rel="stylesheet" />
If you open any .css style sheet file, you will notice that the style tags don't get put in an external style sheetthe link tag tells the browser that the style sheet is pure CSS, so a style sheet simply starts with the first declaration. Note that each Stylin' template's style sheet has its own identifying name; I just used the placeholder stylesheetname.css to represent that name in the link tag example above.
Setting Up the Folder StructureWhen you start building a Web site, you first set up a folder, usually referred to as the local folder, on your computer. This folder ultimately contains an exact copy of the finished Web site located in the root folder on your Web server (see "The Root Directory" sidebar on the next page). When you have finished your Web site, or even when it is still in development, and you are ready to upload the site to your Web server, you need to copy the contents of the local folder, but not the folder itself, into the root directory on the Web server. Usually, you need an FTP (File Transfer Protocol) client and, to log in, the host name, user name, and password. Then you can upload your files and folders into the root folder of your site. You can obtain FTP information from your ISP (Internet Service Provider) or, if you are in a corporate environment, your network administrator. As I mentioned earlier, you are going to use the Stylin' template that is a three-column layout with absolutely positioned side columns and a header. To do so, follow these steps:
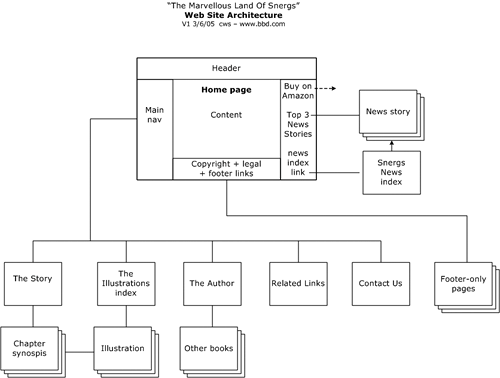
Once the style sheet is linked to the XHTML document, it's time to start developing the site from this template. Let's start at the very beginning. Creating the Site ArchitectureEven for a simple site like this one, it's worth drawing an architecture diagram to make you think the project through and to achieve any consensus you need from team members about the site's structure before you start creating graphics and code. An architecture diagram also helps keep you on track as you work. Figure 8.4 shows the architectural diagram for the Snergs site. Figure 8.4. In this Web site architecture diagram, each box represents a page and the lines represent links between them. Don't start coding without one! I use Microsoft Visio to create architecture diagrams, but you can also use a graphics application like Adobe Illustrator, Macromedia FreeHand, or Macromedia Fireworks. There are a some benefits to Visio, thoughthe connecting lines glom onto the boxes so the connections between boxes remain attached as you move them around; boxes automatically route themselves around other boxes and over other lines; and you just click in the boxes to create labels.
Some presentational aspects are suggested by Figure 8.4 (although its primary purpose is to indicate structure). For example, the plan for the home page is to have the main navigation in the left column, a promotion for the book and news links in the right column, and a footer at the bottom of the content area with links to legal and copyright information. |